. . . . . . Enjoying the journey of quilting

Sunday, August 21, 2016

Two months since I last posted


Finally Posie Blocks are completed - all 17 of them. 14 of them have found a new home and owner. Yippee!! a project completed.


Blocks that I have received so far.
There will be a total of 15 blocks.

Aren't they adorable!


 Thank you for visiting and wishing you a great sewing or quilting day!


Follow on Bloglovin

Thursday, June 30, 2016

Posie Flower Blocks Update - OMG

My goal for OMG - A Monthly Goal was to have completed 15 blocks of which none of the blocks are completed. Many evenings were spent paper piecing the flowers in June while watching Hart in Dixie on Netflix.

Last evening I began chain stitching the flowers together. Easily I can have the blocks completed by this weekend even though I still have today. But as the day develops business is calling me to focus on it rather finishing up the blocks.

Also, we made a trip to visit all our boys and their gals one weekend in June. Now that was much more important than sewing. Such fun we had laughing, cooking, eating, watching one grandson, Caleb, play baseball and celebrating my youngest grandson, Parker's birthday.  


Paper piecing is messy! But then again so is sewing. My little waste basket needed to be emptied daily with all the little scraps and bits of paper being torn off from the backside. 

When sewing up the promo block I used 1.8 stitch length. It was still difficult to tear the paper with out pulling out stitches so I reduced the stitch length to 1.5. It was much easier to tear the paper off, but the bobbin had to be rewound more frequently.

Thank you to Heidi at Red Letter Quilts for sponsoring OMG - One Monthly Goal. It has kept me moving towards finishing projects, and prevents me from starting new ones until current projects in progress are completed.  Click on the OMG - One Monthly Goal button to take you to Red Letters Quilts' blog. 


Thank you for visiting and wishing you a great sewing or quilting day!


Follow on Bloglovin

Thursday, June 2, 2016

June 2016 OMG, One Monthly Goal - Really it is June Already!


I will be just in time for Christmas in July!


Tall Christmas Tree flimsy was finished with May's OMG, One Monthly Goal.You can see the Tall Christmas tree flimsy here. Now that I have a tree what is a tree without decorations? So of course I have been thinking about what sort of decorations will make a Tall Christmas Tree sing.

I did add candlesticks and flames, though not attached. I am thinking about shortening the candles a wee bit so the tree doesn't look so overwhelmed with candles as pretty as they may be. That is one part of June's goal - shorten the candlesticks.


This evening I ordered Christmas fabric for the decorations. I had to pull the trigger and buy quickly as already one of my selections sitting in the sales cart sold! I was a bit disappointed as I really wanted that particular fabric with the candy swirls. The picture to the left shows several of the fabrics purchased for fussy cut ornaments. So the second part of June's goal is to cut and sew ornaments.


Now swinging back to Spring

 I have joined in with a group of quilters participating in a Spring Block Swap. The blocks are due in November and I have already received two in the mail. I love the butterfly and the lady bug!!

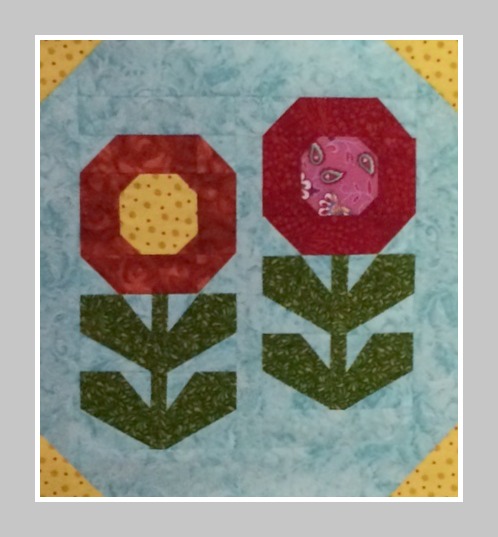
The Posies Block is the one I am sewing. The picture shown here is not the fabric I am using but the colors are close. The block is going to be made up of all batik fabric.

The third part of my June OMG, One Monthly Goal is to complete 16 Posie blocks. I have 16 Posie heads completed and now in the process of chain stitching the other 16 heads.

You can see a picture of my completed Posie heads here.


RedLetterQuilts


I have a third goal for the month of June. I have my fingers and toes crossed hoping I will find the time!! It is to finish my design board. My little space is a combination office and quilting studio. I won't be able to use the full wall space as once planned since I needed to move my desk right against it to squeeze some stacking cubes in the other corner for office supplies.


The left side is completed. The right side needs batting wrapped on it and then needs to be hung so it reaches the ceiling. I have been layering projects on top of each other. At the moment I have documents pinned which will have to find a new place. Maybe that is what I will do once I complete this message.

Hope to see you at Red Letter Quilts where Heidi is hosting OMG, One Monthly Goal.


Thank you for visiting and wishing you a great sewing or quilting day!


Follow on Bloglovin

Monday, May 30, 2016

May's Projects for OMG - A Monthly Goal


One of May's goals for  OMG - A Monthly Goal was to complete the Tall Trim Christmas Tree flimsy and I am happy to say it is completed.

Do you like the candles and lights?  They are not attached to yet. I worked all day Sunday adding a white border and making the candles.   The candles were not originally planned at the beginning, therefore I accomplished more than anticipated on the tree.

There will be more decorations to come.  I have fabric picked out from which ornaments will be fussy cut to hang on the tree.
 

The other project was to plan a block and purchase fabric enough for 16 blocks. Below is a practice run of the block. 


But I completed 16 out of 28 flower heads!


Thank you for visiting and wishing you a great sewing or quilting day!


Follow on Bloglovin

Saturday, May 21, 2016

Goal Setting Does Work!

Beginning this month only the very top of the tree was sewn together, and now the tree pattern itself is completed. A border will be added, but it will not be a contrasting border in green fabric as shown on the pattern. My border will be white on white print used in the background and the binding will have a flange of red and cream stripe with the white on white print on the outside edge. 

I saw another version of this pattern made by another quilter where she added candles with flames on the tips and other decorations actually sewn on to her tree. Her version of the tree was quite stylistic and whimsical using totally non-traditional colors and fabric for her tree and decorations. It was quite adorable. 

I want to add red candles with flames on my tree, but keep with the red buttons and hanging mini-mini quilt blocks for decorations. My colors will be traditional. Someone suggested that I cover buttons to add to the tree vs. plain red buttons. Great idea! 

As the title of this blog message suggests "Goal Setting Does Work!"  Red Letter Quilts who is sponsoring OMG - A Monthly Goal is working for me. I determine each month what I can feasibly achieve when looking at my overall business and family schedule. For the month of May I planned to complete the Tall Trim Christmas Tree flimsy and to plan the blocks for a group Spring Block Swap with a group of other quilters.

The flimsy is almost complete only needing borders. The other project that was included as a goal in May has actually been completed. 

Beginning in May there was only the instructions for the Spring Swap Block. My goal was to choose the design and fabric. So I am whooping it up as that has been accomplished. Not only that I completed a promo block to make sure I liked it. And I do!


The requirement for this block swap is to use batik fabric for the background, and the overall block pattern is to be a "Snowball" where each corner is made with a 3 inch square. The center can be anything that we want that is representative of Spring. The block can be paper pieced, appliqued, or any other pieced block pattern in the center. Beads, embroidery or any other kind of embellishments can be added. 

Electric Quilt came to the rescue when designing the block, actually 2 blocks as the the flower head is separate from the leaves and stem. Both are 4 inch blocks. The final swap block size is 12 inches. 

I made a quilt with this particular pattern, but it was larger in size and didn't have the inside triangles creating the mini snowball block. I redesigned the Posie center to give it more of a rounded look.


Isn't this batik fabric yummy? Once I made my promo block it was time to go shopping. My schedule has been horrendous so I had to purchase fabric online as it was quite difficult to find the time to travel to a quilt or fabric store. I rather touch, feel and see the fabric to make sure the colors are true and work together in person. As you all have experienced some colors on the screen look different than what they actually are when in hand.  So yes, I did the happy dance when the fabric arrived because the colors were perfect and actually more beautiful than anticipated. 

I purchased my fabric from Thousands of Bolts. They make it so easy to coordinate your fabric selections using their Quilter's Toolbox. All you need to do is import fabric swatches from their website. 


This is a picture of Thousands of Bolts Quilters ToolBox with my fabric swatches imported. You can resize each of the swatches somewhat. As you can see I couldn't get the green more narrow for the stems for my makeshift posies. I chose the colors on the right with one exception of the red batik is different. This tool is so helpful in choosing fabrics that work together. 

So with 10 days left in the month I have made great progress. I may actually get more done than I had set for my goal. Last evening I washed all the batiks to prevent bleeding, and all have been pressed this morning. The paper pieced block patterns have been printed and cut out which were done one evening this week while watching NetFlix.  I may get a block or two, or three done before the end of the month. Yippee!! Progress!

So off topic -  I want to show-off the beautiful flowers I received for Mothers Day from my son, his fiancee and 3 grandsons. I so enjoyed them! 


So until next time . . . keep on sewing, quilting and you might want to check out OMG, One Monthly Goal if you too want to get those projects done!. Click on Heidi's icon that is on the right side bar, the gray circle with OMG on it. 

Oh yes! I am joining the party over at Crazy Mom Quilts. Hope to see you there!


Thank you for visiting and wishing you a great sewing or quilting day!


Follow on Bloglovin

Tuesday, May 3, 2016

It is a new month and that means it is OMG time!

If anyone is following my blog you are probably wondering why all my recent projects are winter or Christmas themes. Well it is because I want these projects for Christmas decorations, and if I wait until November or December my work schedule gets too hectic with little time to decorate or sew. 

And what better way to finally get this Christmas tree completed by making it my "OMG A Monthly Goal" for the month of May. It was my goal to have the flimsy done last month, but didn't quite make it. I actually worked on it this past Sunday, the first of May.


The pattern is the "Tall Trim the Tree" pattern by Cindi Edgerton. The height of the tree is 76 3/4"  and width is 26 3/4", a nice size tree. I picked up this pattern last September while at a quilt retreat with the idea to sew up last year. Aha, well you see how that worked out. It didn't!

Quilt Pattern Tall Trim The Tree by Cindi Edgerton - Little Bits

Some small ornaments for the tree will jazz it up a bit. The pattern calls for red buttons to hang the ornaments. Anyone know where you can find red buttons online?

The fabric I am using is Northcott's Artisan Spirit Shimmer. I love this fabric!! 

 The tree uses 4 different shades of green, 1 white print, 1 white and 1 cream.


My goal for this month will be to complete the flimsy and save the sandwiching, quilting and decorating for a later time. Maybe next month. 

I need to get going on with another project for a block swap that is due in November. I have only the instructions at this time. No fabric and no idea for the center block. The block is a snowball block and the center is to be a neutral batik and darker, contrasting colors in the corners. The center is to have something that is representative of spring. It can be pieced, embroidered, beaded, applique and etc.

The big goal is to decide on the fabric and what the center is going to have in it. I have an idea of what block I will be making. So excited to buy fabric for the blocks!


Confessions of a Fabric Addict is also sponsoring May Goals!! I am linking there as well!


Thank you for visiting and wishing you a great sewing or quilting day!


Follow on Bloglovin

Saturday, April 16, 2016

Christmas Carpenter Star

 
Christmas Carpenter Star on the Fence

I am giddy with how out it came out. The Carpenter Star pattern was a gift from a quilting friend while we were on a retreat together. It has been fun to see what the other gals have made with their Star and the different fabrics used.

 
Border Print is Pine Cones and Needles - Looks great hanging in the pine tree in my back yard.


Binding with a Flange


 Karen's Quilts, Crows, Cardinals - Red Bird Co. has a great tutorial on how to make binding with a flange. For this quilt I had to make some adjustments as I didn't want quite the over lap of binding on the front as per her instructions. It simply would have covered some of my free motion quilting design. On another quilt, not having quilting so close to the edge as mine, it would be gorgeous with larger width of binding. Can't wait to try it again. Thanks Karen for such a wonderful tutorial and showing us another great way to enhance our quilts. As Karen did I used 12 wt. thread to stitch the flange down. It nicely shows off the stitching.

Metallic Gold Thread Gridwork 


Not shown here the cornerstones on the red narrow frame were also quilted with metallic gold thread in even more smaller grid work. My plan was to incorporate more metallic gold but changed my mind.

 
Feathers and Grid work


Ribbon Candy and Scallop Designs


If you go back to the first picture above you will see that the piano key stitching ended up being every 1 inch vs. every 2 inches which helped the scallop border to be more prominent.


Ribbon Candy

I just love the Ribbon Candy design! It took some practice and penciled in lines 1/2 inch on each edge to make the curves in the "S". Ribbon Candy seemed quite appropriate on the  Christmas Carpenter Star quilt.


Linking up with:

April 27, 2016  - An Addendum - Christmas Carpenter Star  was a quilt on my list to finish in April! I met the challenge of completing the biggest project for OMG - One Monthly Goal at Red Letter Quilts. 

I wrote about entering the quilt as the goal to finish - here. And here is an in between message, a progress report - here.

I also wrote about finishing the flimsy for the Christmas Tree wall hanging. I have 3 more days and it looks pretty iffy at the moment. Progress has been made where I reinforced the pattern in order to paper piece it after cutting out the pattern sections and ordered more fabric needed to complete it. 

Again thank you to Heidi for hosting OMG - A Monthly Goal! Need any encouragement to finish those unfinished projects? If so join us at her linky parties. She is giving away prizes too,nice ones at that! Though that is great, the best is getting those projects   completed!


Follow on Bloglovin

Tuesday, April 5, 2016

It's Coming Along!


Each step I made a decision as to what the quilting design would be, not planned ahead. So far I am quite pleased. I was planning on zigging every other block in the grid, but realized somewhere along the way the grid was not equal on each side. Any additional stitching would only highlighted that the grid was off center.


There are 2 layers of Warm and Soft batting which gives the star a trapunto effect. I used my hopping/darning foot to free motion quilt the feathers. This is the foot I have been using for years to free motion quilting.

In the latest issue of APQS magazine I was reading about a free motion quilting foot that fits a Janome. I had not idea that there was such a thing. And of course I went web exploring and found it on Amazon, one that would fit my low-shank Janome. So I found it, bought it and received it in 2 days! I only experimented with it but I can't wait to use it on the borders of the pictured Carpenter Star Wall Hanging. Actually I am naming it my Christmas Carpenter Star Wreath.


Since I was using my hopping foot I used monofilament thread so the stitching didn't show too much. Oh I should say so my imperfections didn't shine.


The center of the star with the grid work is done in gold metallic thread. I am thinking about using it in the red border as well but not sure about the design yet. Remember I said no planning, just designing as I go along.


My new toys! Can't wait to try them out! The far right is a 1/4 ruler foot and a small open toe foot. Now I will have to see what I can find in free motion quilting rulers.

Linking up at:
Sew Fresh Quilts


Follow on Bloglovin


LinkWithin

Related Posts Plugin for WordPress, Blogger...